
Welcome to the blog of Wong Choon Yue
Venturing out
June 29, 2021
Hello there! If you are here for content on my robot-making adventures, I would certainly like to thank you, and also apologise for not updating this page. Many changes have occured personally and professionally so I have had to divert my focus somewhat. Regardless, I miss designing and fabricating things very much. So I hope to generate some content soon.
Here, I wish to announce that I have left my position at the Nanyang Technological University since June 2021. This is to allow me to focus on my spin-off startup: MAJU Robotics. So for news about what I've been up to, the website "www.majurobotics.com" would be a good place to check out. This blog is also being migrated there.
In this final post here, I also wish to express my joy at having worked at NTU for almost a decade as an employee and for also a number of years as a student. It is through my work at the NTU Robotics Research Centre (RRC) that I have had the chance to use my work to interact with countless people. These include students from kindergarteners to PhD candidates, as well as policy-makers, royalty and ministers from Singapore and abroad. It has been an awesome journey and I hope for sure to continue it via my spin-off company. The RRC has been an awesome place to learn and practise my craft. I would recommend it as an excellent environment to develop one's skills in making robots.
To contact me, please drop me a text via Linkedin! For now, it's over and out from NTU! :)
Getting picky in China
January 10, 2019
My gosh! It has been about 8 months since my last post here. The content is severely lacking and I really do apologise if you have been expecting new content. I have a "visitor counter" to this webpage to assure myself that I have an audience, so I know there are at least a few tenacious fans of this page. If you are a regular or even infrequent visitor, I would like to thank you for visiting and to wish you a joyous 2019!
In the past months, I have been involved in some new exciting projects regarding the development of grippers for use in hospitals. Three grippers have been developed. They are meant to pick surgical tools, medications (e.g. blister packs, bottles), and hospital linens (e.g. towels, gowns, blankets). These grippers can also be used for other industries, such as in hotels to pick and sort linens. Unfortunately, as much as I would like to show my work off, I can't post pictures of them due to intricacies involving intellectual property. :(
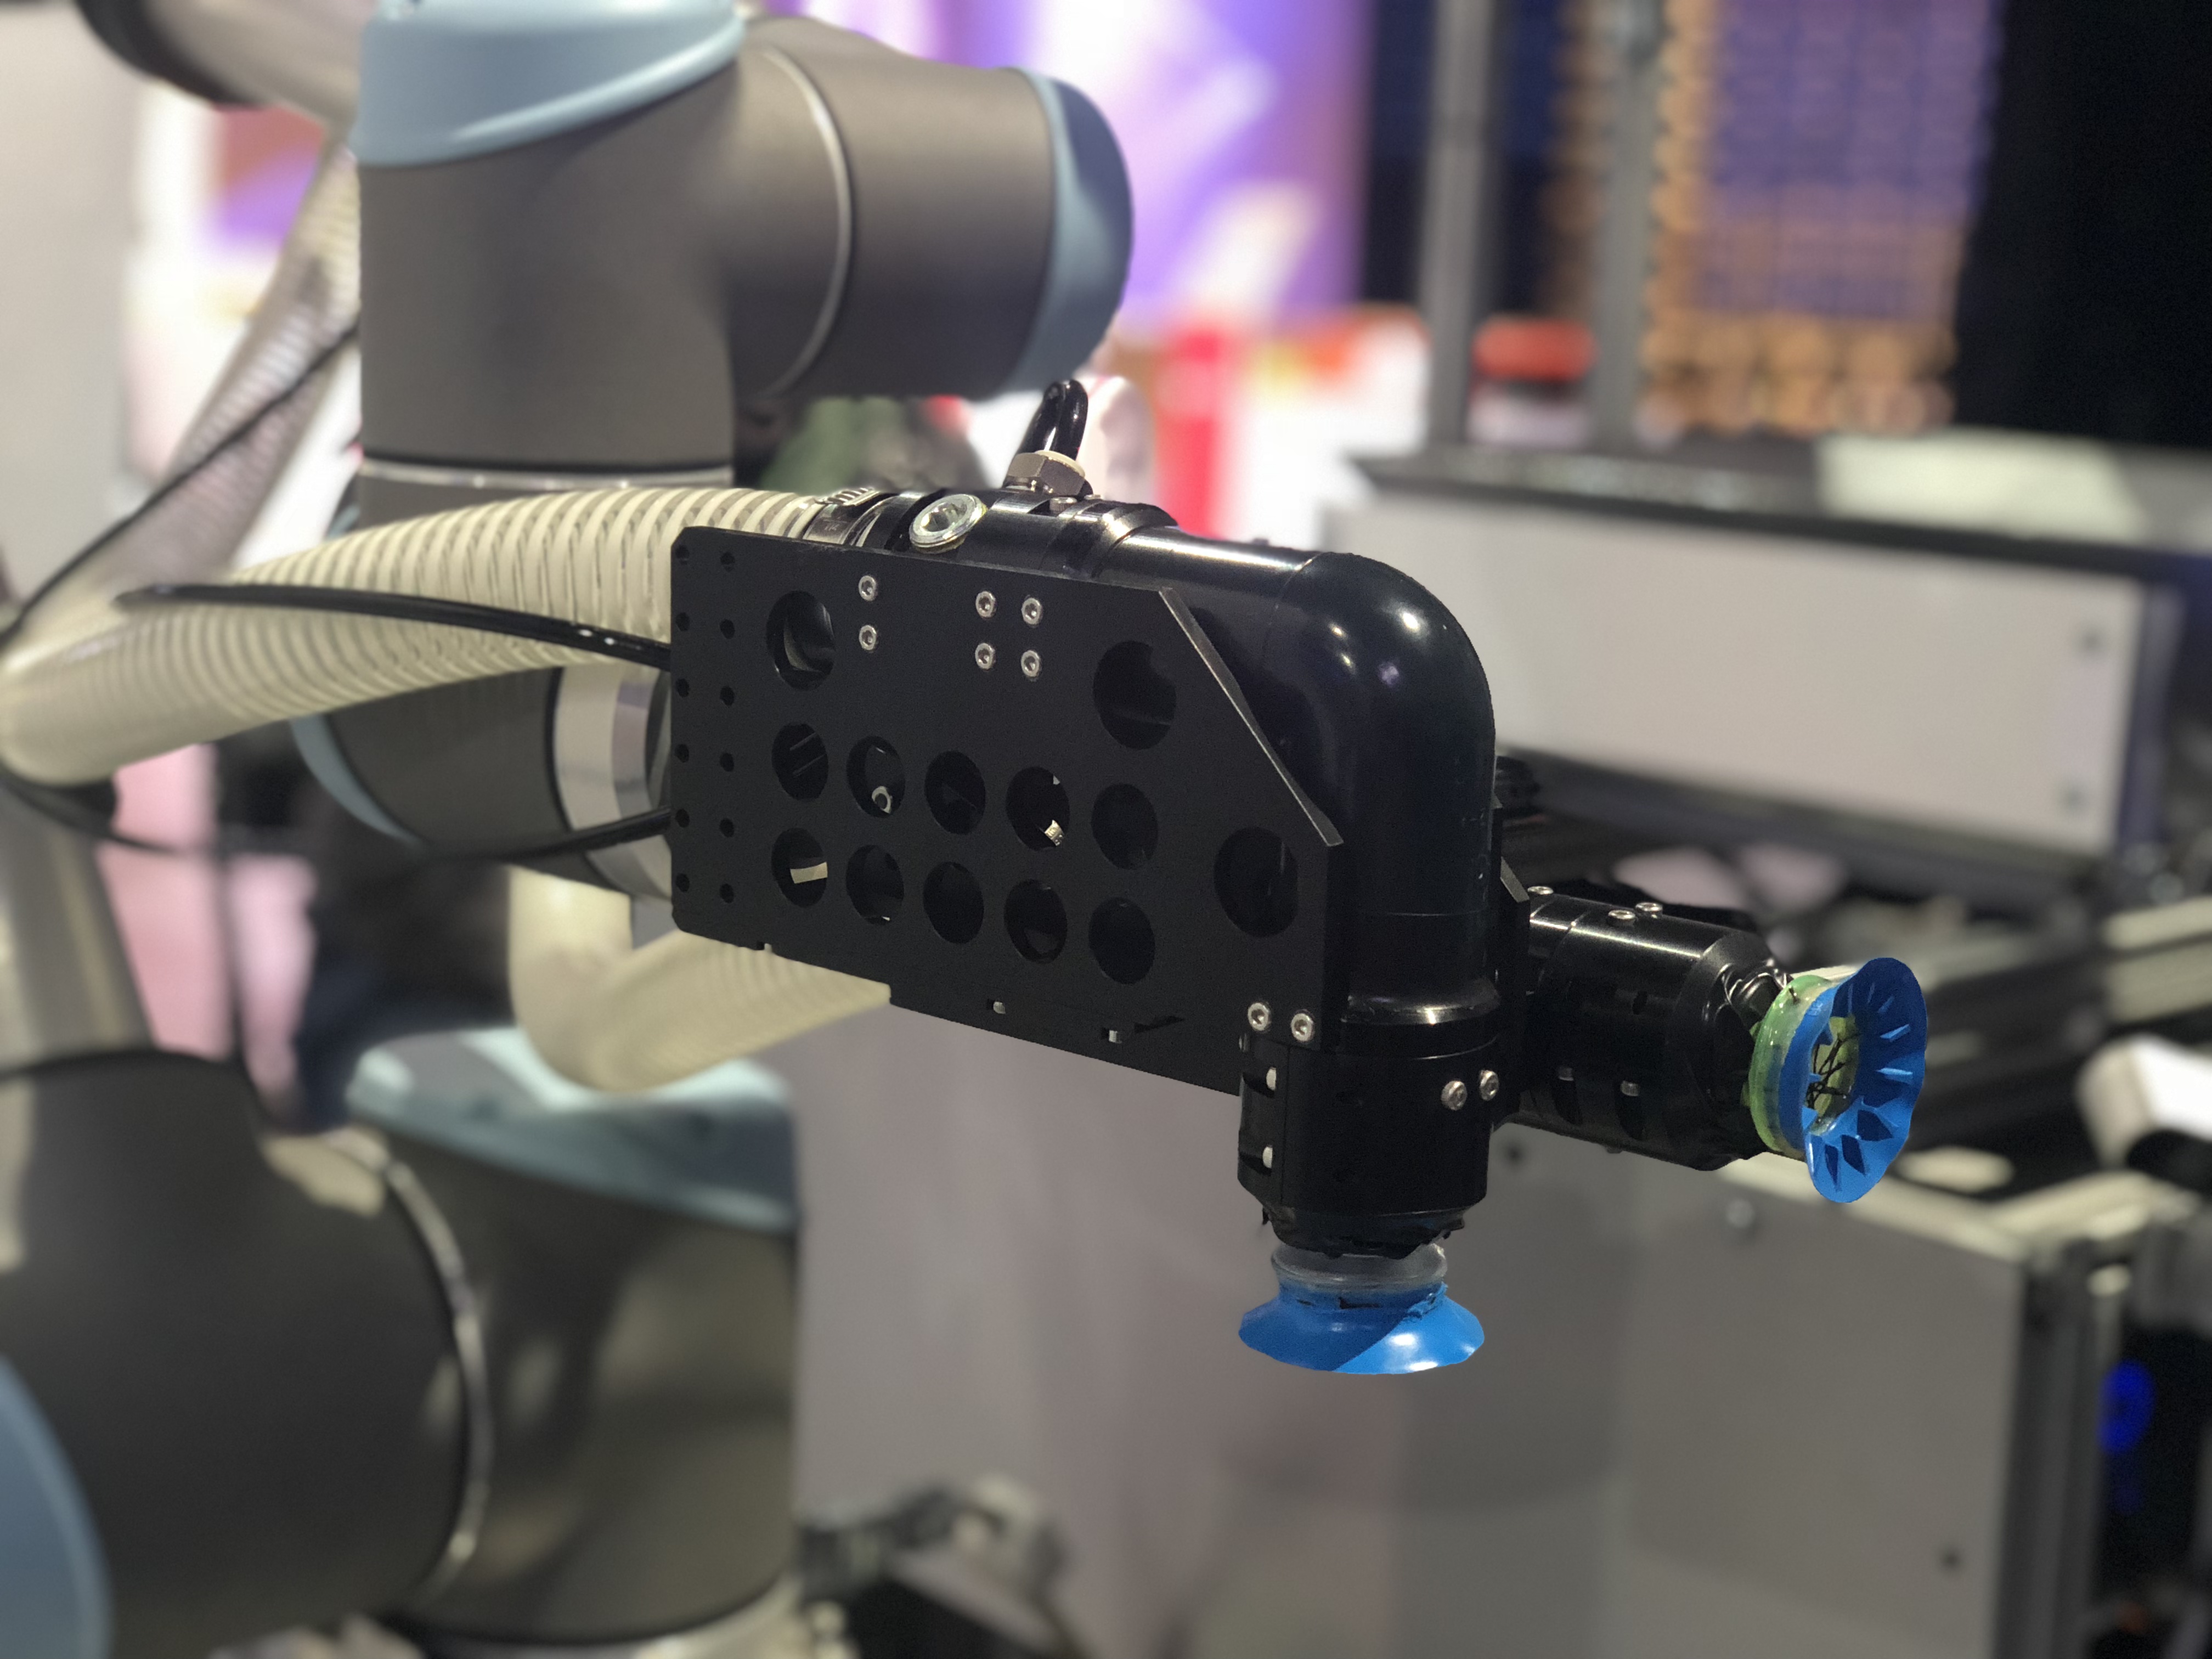
Thankfully, there is some content that I can share: my work in China in December 2018. For two weeks before Christmas 2018, I was a part of Team Nanyang, a team participating in the JD-X Robotics Competition 2018 (16th December, in Tianjin, China). The theme of the competition was to order-fulfillment within a warehouse/supermarket. Various household items like toothpaste, books and canned drinks were laid out on shelves within an arena. Participating robots were to automatically pick items from a list and then deposit these items into a tote box, within the space of 6 minutes.
Our team developed a solution based on a UR10 robot arm which has been mounted on a holonomic mobile base. My gripper served as the UR10's end-effector. Like most teams in the competition, we relied on suction cups to pick the desired items. However, our gripper's design is unique in having two suction cups: one forward facing cup and a downward facing cup. The forward facing cup is used to pick objects that present a larger surface from the front or sides, such as shampoo bottles. The downward facing cup picks objects which are wider than they are tall, like packets of tissue or books. Such a gripper design has no moving parts and would be more reliable on a warehouse robot that has to perform the task of grabing items millions of times.
Our team had high hopes for the competition but unfortunately did not perform as well as intended. We did not manage to properly align the robot arm's movement to the location of each target item, resulting in the robot arm missing its targets. While there were other factors involved, much of the cause of this poor performance I feel lies with a faulty mobile base. The delivery of this base was delayed by months. It reached our team only days before the competition. Such problems do sometimes occur when developing technology. Essentially, our team had only days to put a robot together. Despite this setback, the team demonstrated an impressive effort in assmbling the robot within a seemingly impossible amoutn of time. Our relief in accomplishing this task was short lived as we realized that the mobile base remained problematic. Much of our time was thus spent troubleshooting, rather than refining our robot. We've still got much more to learn but are now wiser, more experienced and hopefully even stronger than before! Big thanks to JD-X for organizing the competition and congratulations to the winners!
Getting sorted
May 28, 2018
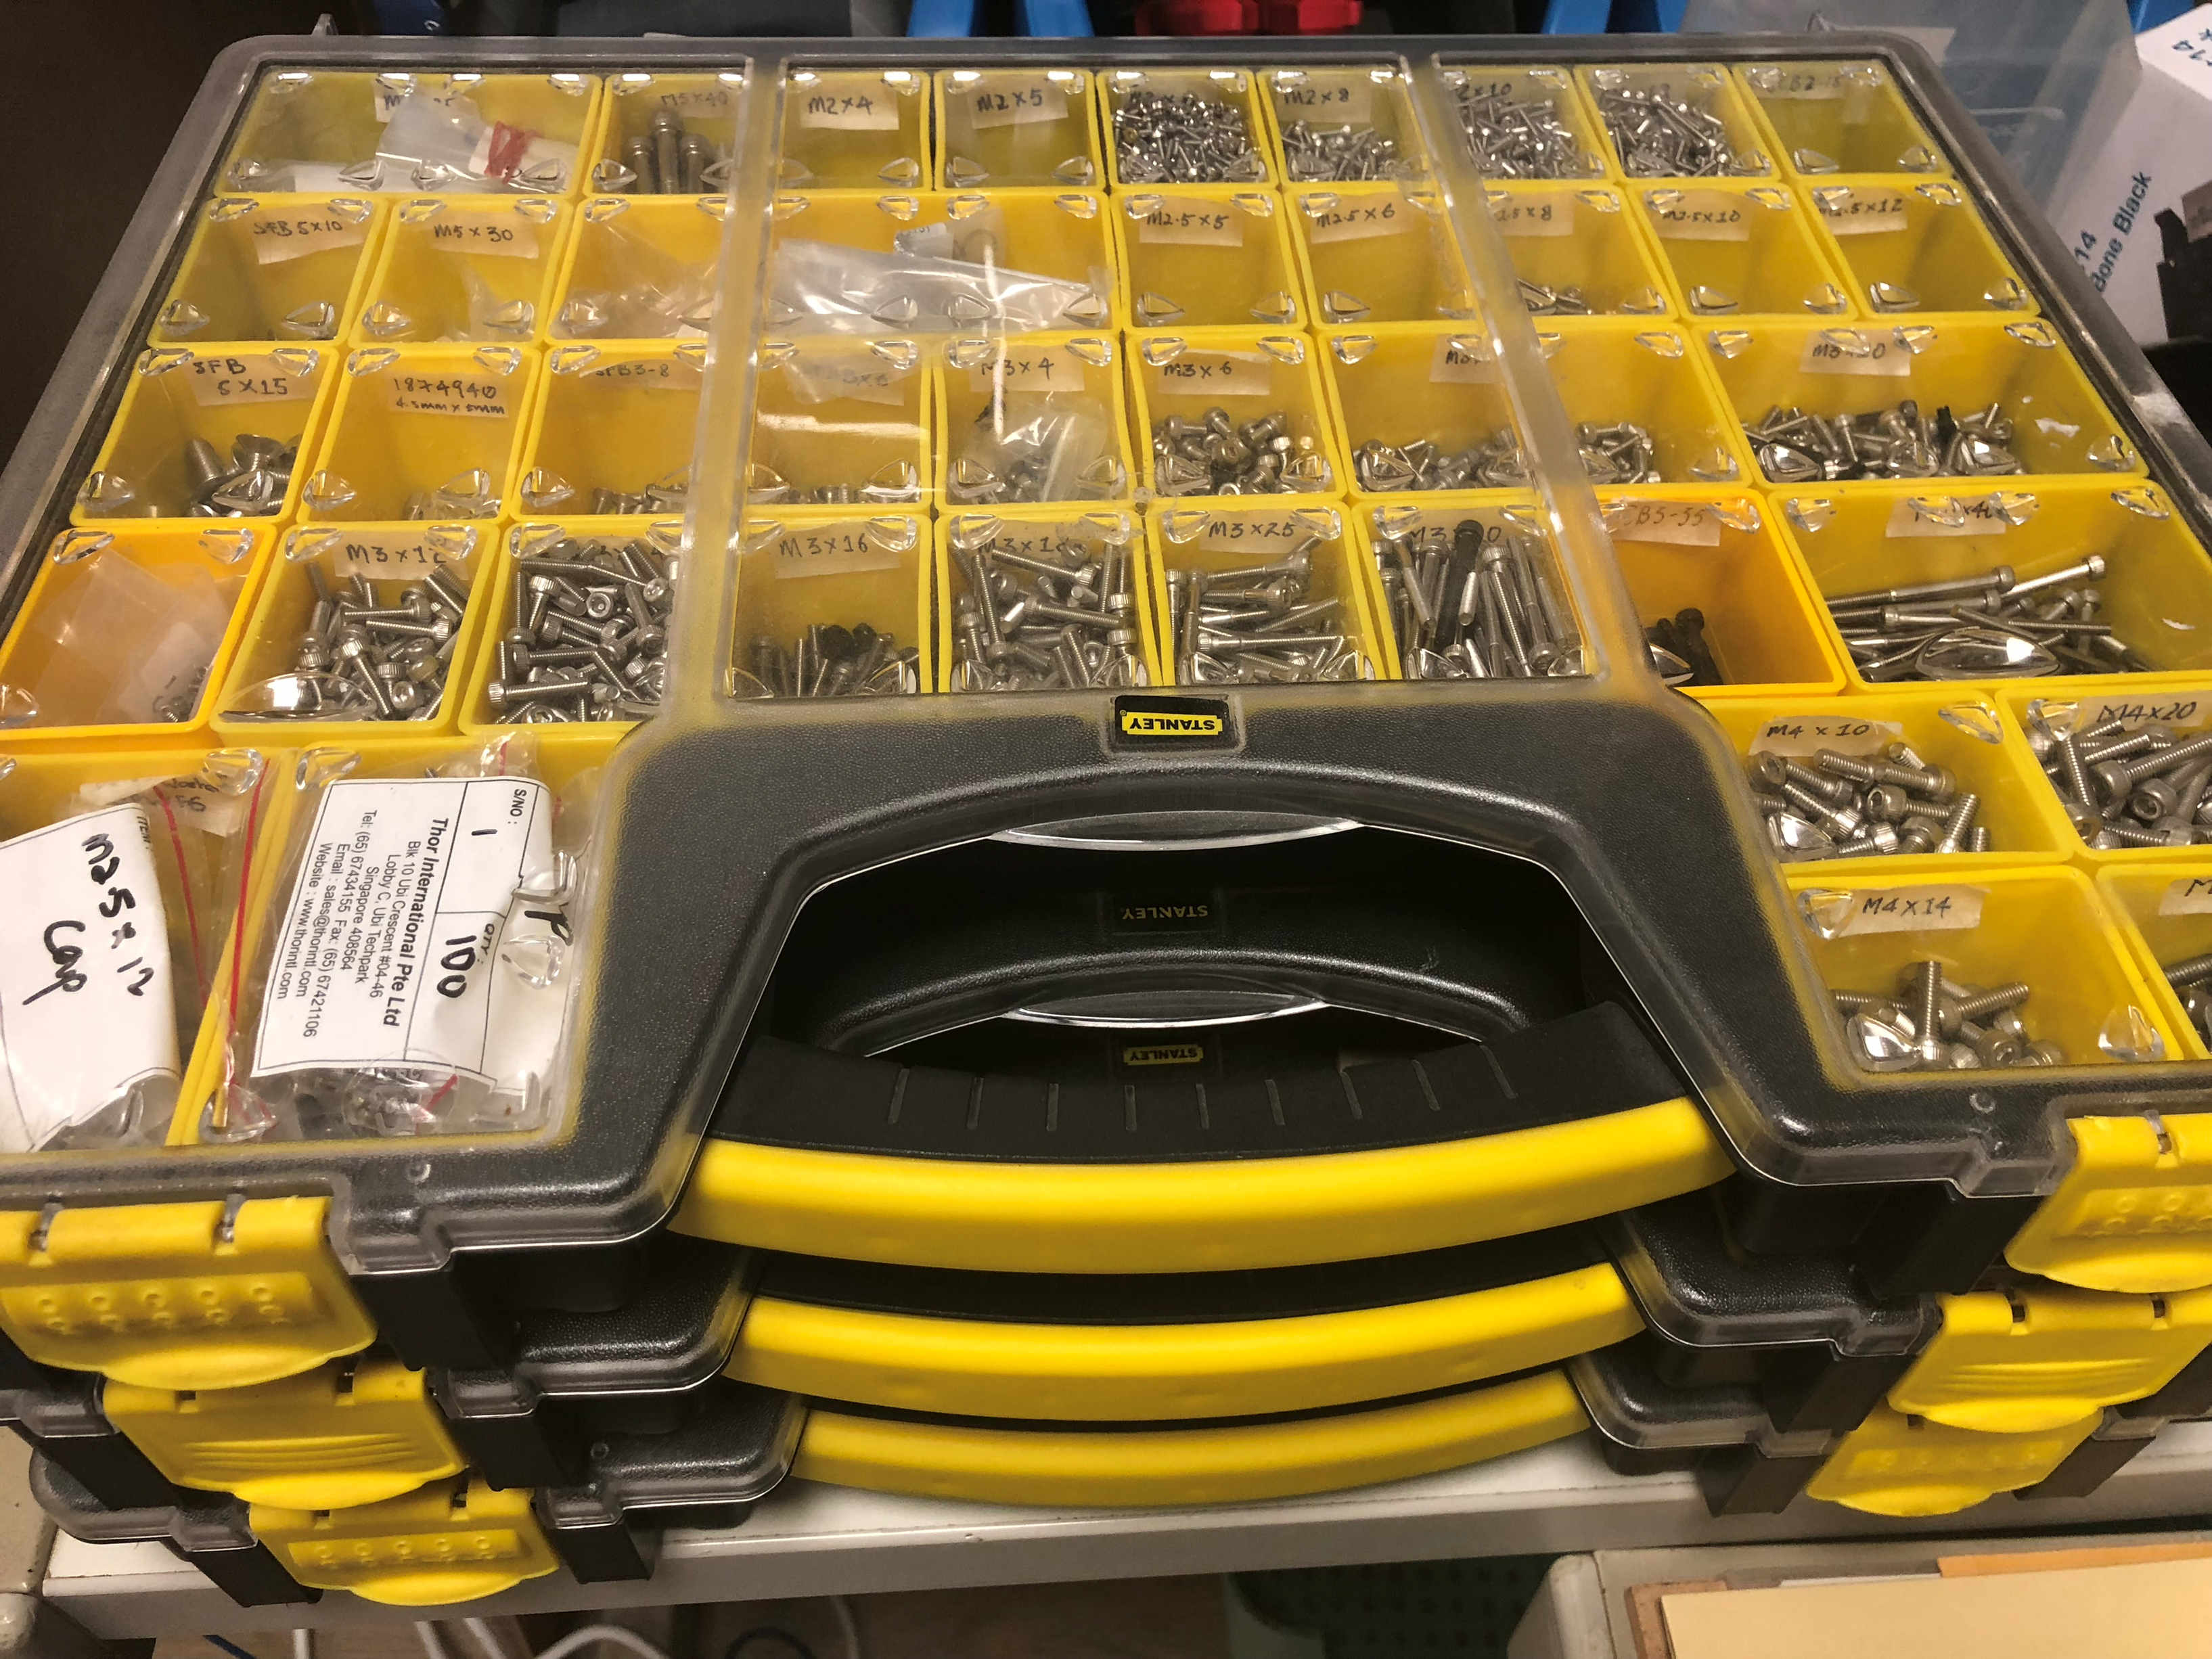
In 2012, Adam Savage spoke on YouTube about his Sortimo cases for storing screws, bolts, nuts electronic switches. A number of people have been inspired by that video and have created their own storage systems. Any serious maker will likely find that a repository of commonly used fasteners indispensible. Just as useful I think, is also the storage of less commonly used items like very small screws for instance. It sure saves me a lot of stress from hunting down obscure parts when I am on a tight schedule.
I didn't manage to find Sortimo cases here in Singapore. However, I did find a similar one from Stanley at Element 14. Like the Sortimo ones, the Stanley cases don't come cheap at about $38SGD a piece. Still, they are well worth the price. My work space is extremely messy as it is due to a crazy schedule. Any little bit of organization that helps me out is much appreciated.
Getting a grip
November 24, 2017
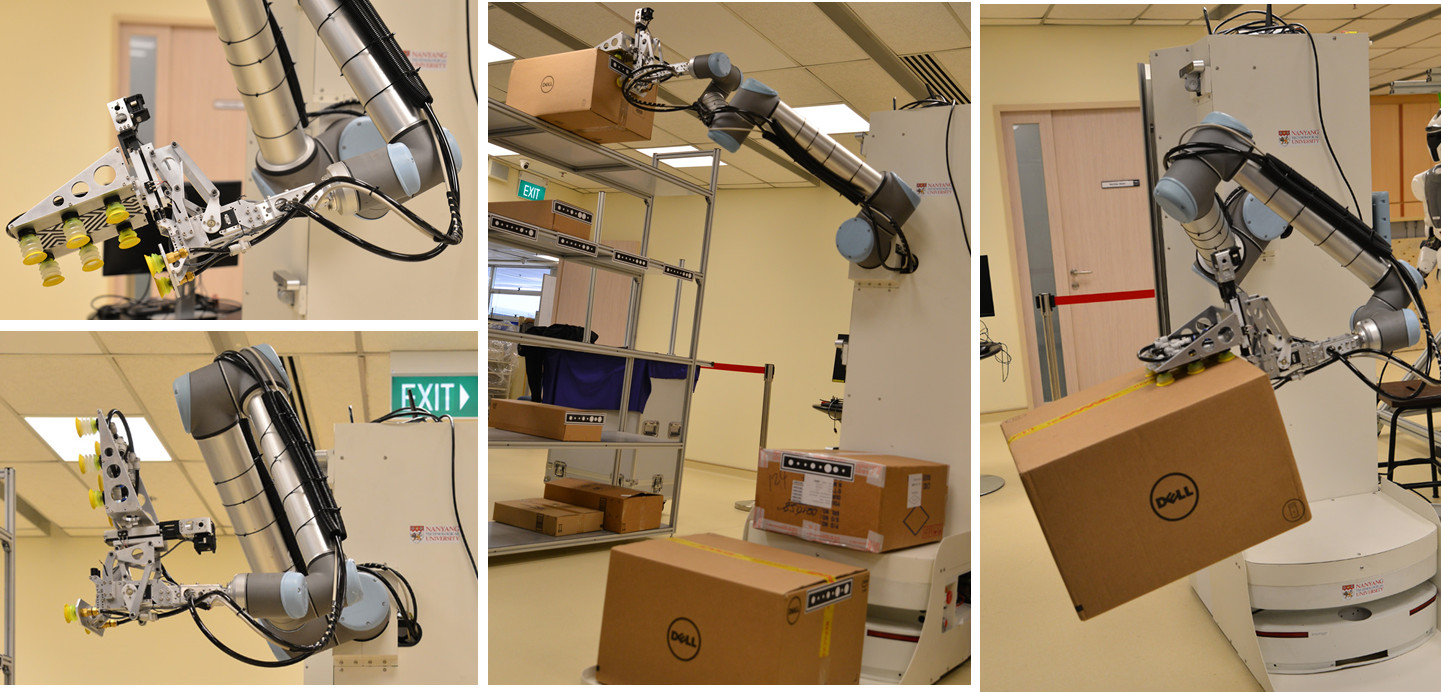
A team from the NTU Robotics Research Centre is headed to the DHL Robotics Challenge 2017 in Munich, Germany. This competition to be held on 7th December 2017 will require a mobile robot to approach a shelf full of boxes to pick selected boxes off. Each box weighs a maximum of 5kg. The selected boxes are to be loaded onto the mobile robot for transportation away to another location. The NTU team consists of researchers in computer vision, programming, as well as electronics.
I'm priviledged to assist the team by designing a gripper mechanism. The gripper is mounted at the end of a robot arm. It uses a number of suction cups that grip the selected boxes from the top and side. Instead of the simple 4-bar linkage, this gripper uses a 6-bar mechanism to generate two gripper positions: open and closed. The 6-bar mechanism was selected due to a number of reasons. For instance, the mechanism kept the front of the gripper free of parts so that nothing would obstruct the suction cups when they came into contact with a box. The designed mechanism also provided greater mechanical advantage than the simpler 4-bar linkage, although it has to be said that this is not a general rule.
Mechanisms (or linkages) dictate the path in which the robot's limb moves as well as the speed and torque at which it does. They typically consist of links as well as joints from which links rotate. A commonly used mechanism are scissors. Each arm and blade on the scissors may be considered a link. The pin in the middle of the scissors is a rotary joint. An elegant mechanism can reduce the number of actuators used, hence lowering weight, simplifying the robot and boosting cost efficiency.
An excellent resource for learning how to design mechanisms is the book titled: "Advanced Mechanism Design: Analysis and Synthesis. Volume 2" by Sandor and Erdman. It does a great job of explaining how we can create mechanisms graphically by first defining some goal positions for the mechanism's link. This portion of the book should be easy enough even for secondary school students who are keen. To get started, you need only some basic stationery. A cheap method to create and test your linkage designs is to use ice cream sticks for links. For joints, push thumb tacks through the ice cream sticks. Another excellent book on mechanisms is the "Mechanisms and mechanical devices sourcebook" by Sclater and Chironis. This book is full of beautifully illustrated mechanisms that inform and inspire the reader about elegant linkages.
Where have I been?
October 10, 2017
I do realise that I once again have not posted on the blog for a while. I apologise if you are disappointed at the lack of content. Frankly, I am too. I am currently not doing much in terms of building new things and am mostly preoccupied with managing projects and publicity events. It's not such a bad thing but it does mean that there isn't much in terms of building things for me to talk about here. I am striving to once again to have further opportunities to make things so please be patient. I will share my builds when I have a chance. Thank you for your interest.
Flushed with excitement
July 10, 2017
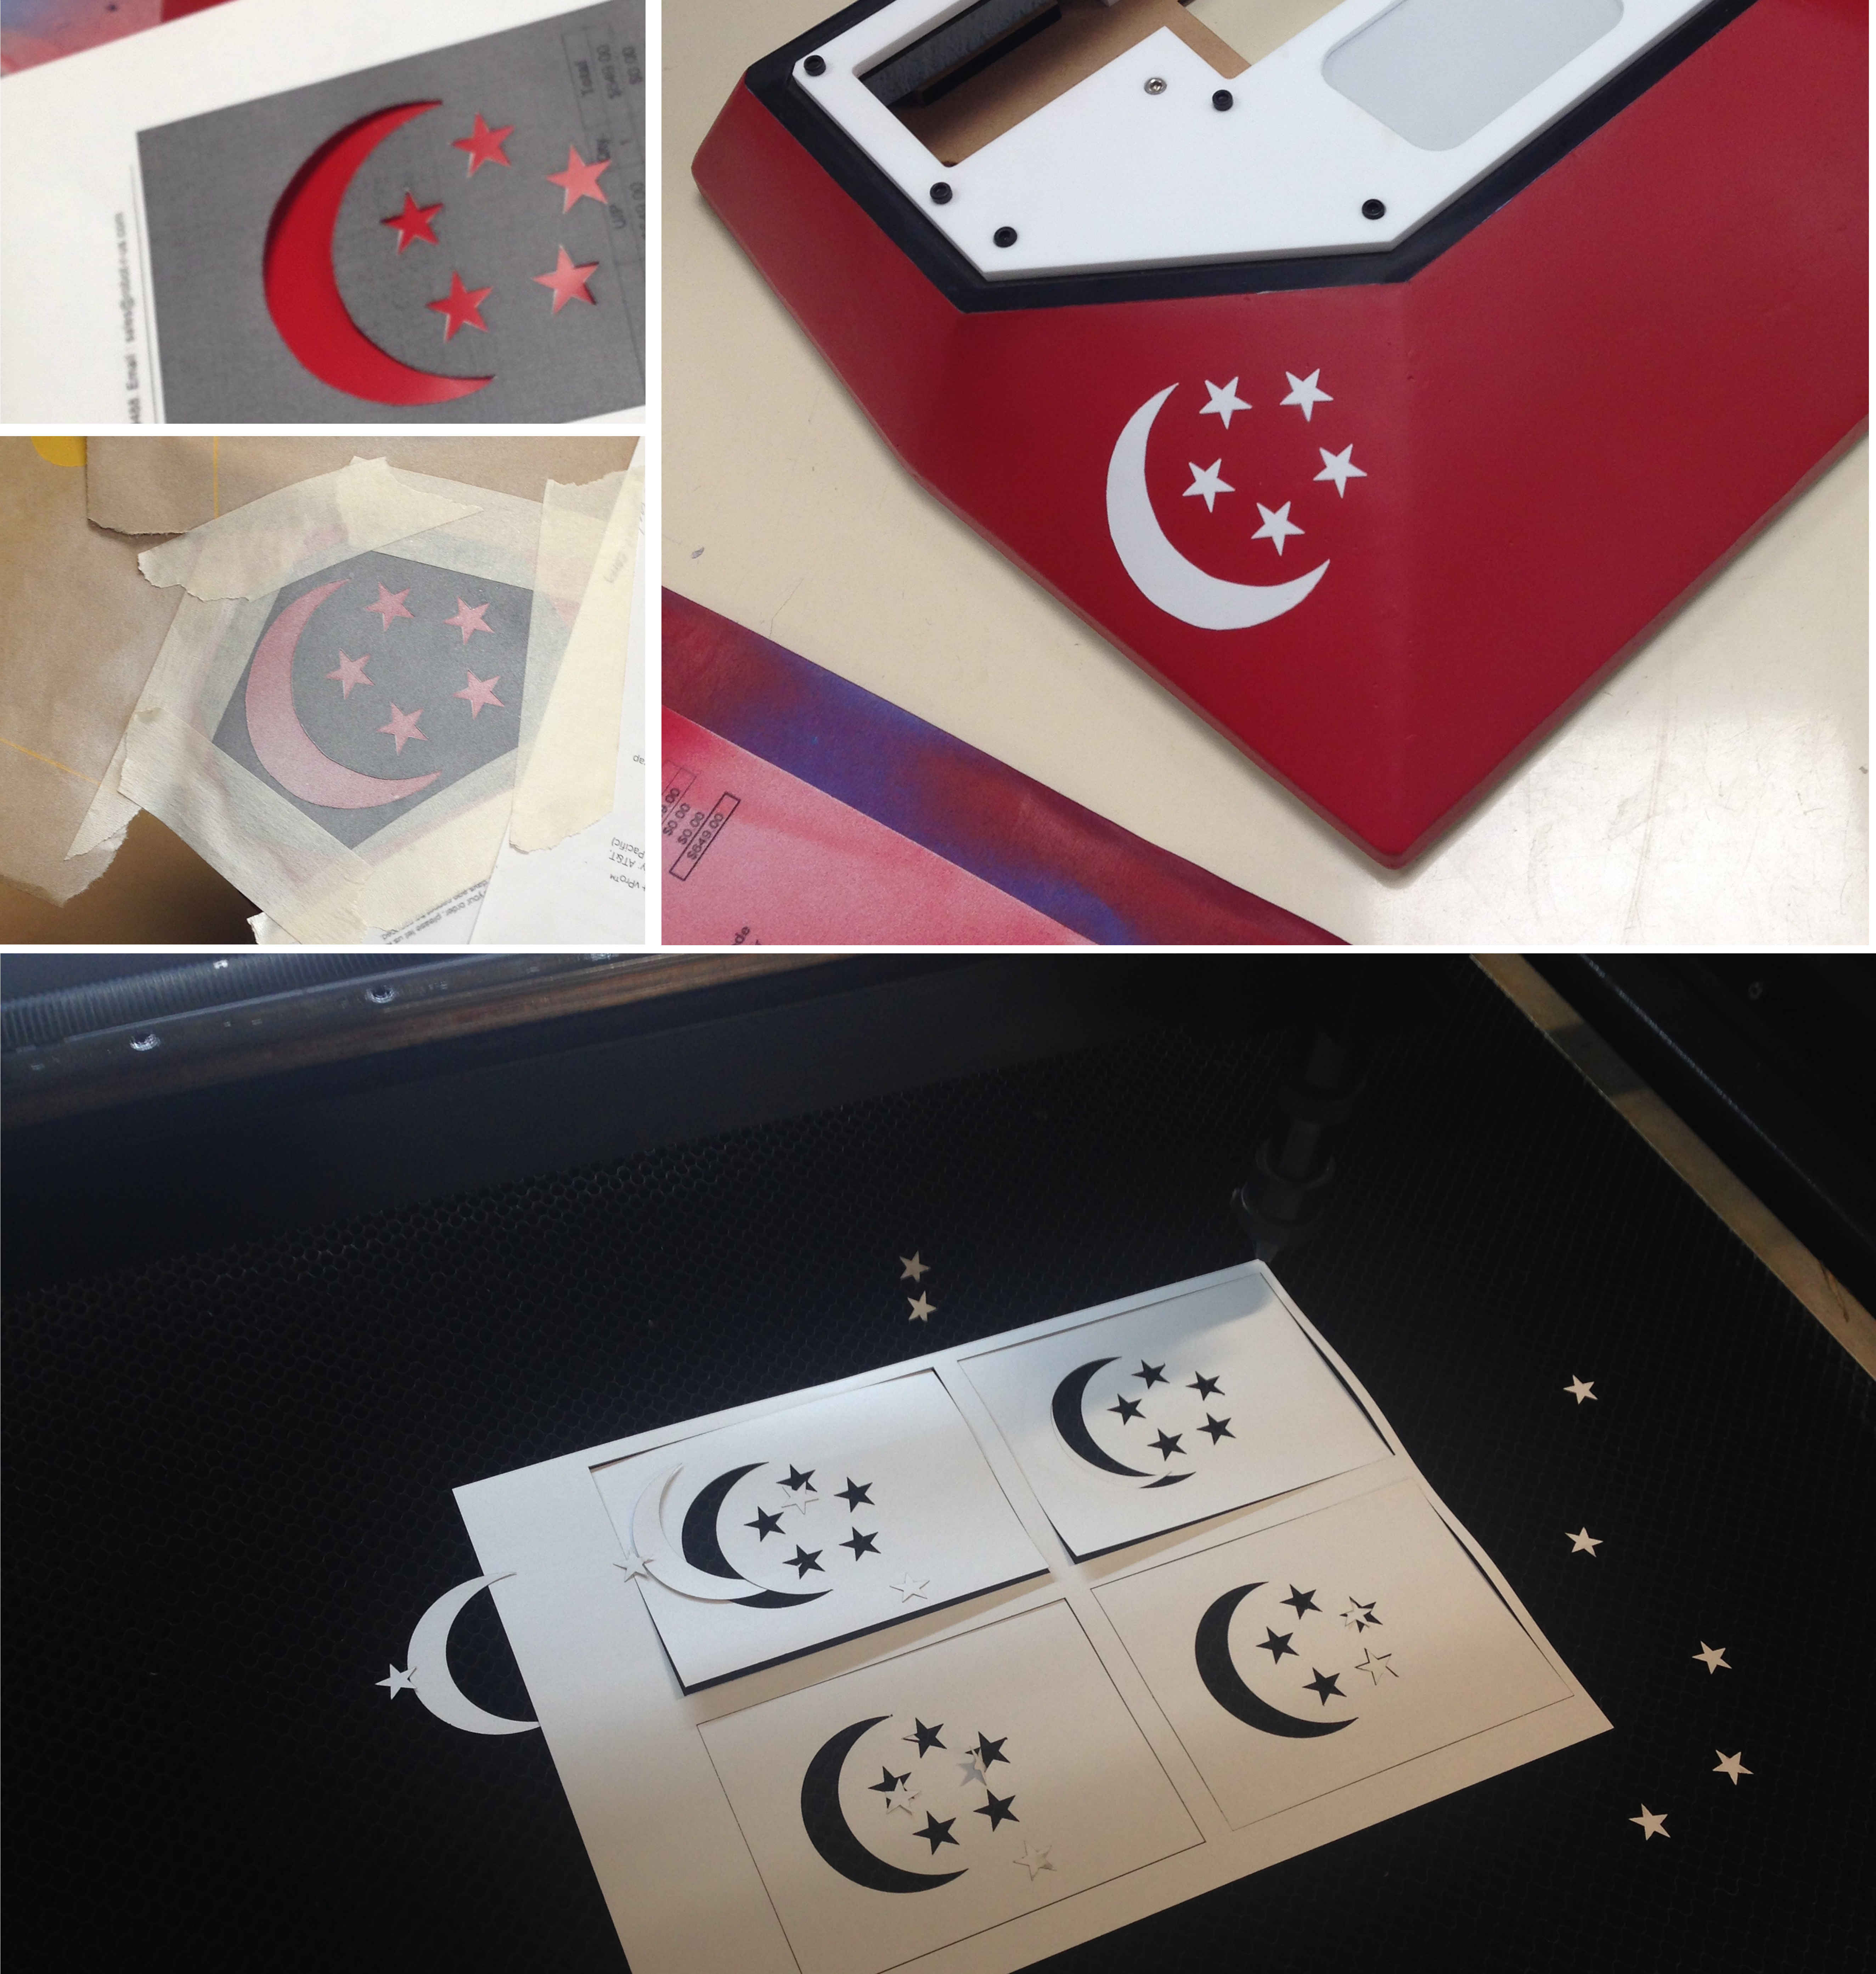
EDGAR's chest plate is currently coloured red and white to match Singapore's national colours. I thought I would add the crescent and five stars for a bit of added detail. I have to say it turned out better than expected given that this is the most complex masking job I've done to date.
To create the mask (shown in the picture at the top left corner), I printed the pattern out with my printer and cut the crescent and stars out with an Xacto knife. I then applied spray-on adhesive to the back of the mask so that it would adhere to the chest plate's surface and ensure clean and neat lines during the spraying process.
I sprayed a number of light coats of white paint once the mask has been applied into position, ensuring that the underlying red does not show through the white. Peeling off the mask (after the paint has dried) is very rewarding. In case I have to use the mask again, I cut four more of them using the laser cutter (bottom picture). It's much quicker and definately more accurate than me doing it freehand.
It's your line, EDGAR
July 8, 2017
Actress Julie Tan rehearsing with EDGAR for the National Day Parade 2017 Media Event. In the picture, it's EDGAR's turn to speak and everyone is hoping he won't forget his lines.
Practising for the NDP is hard work for all the staff and dedicated volunteers. Together with our regular projects, the wife (Ms Pang Wee Ching) and I pull pretty long hours. Still, we'd say that it is worth it as few are granted the priviledge to showcase their work on a stage as grand as the NDP. A big THANK YOU to the NDP Show and Organizing Committees for including our work in Singapore's 52nd birthday celebrations!

Just keep running
May 22, 2017
NTU has a scenic track for running around the campus. It runs adjacent to the forrest and thus sightings of wildlife such as kingfishers, eagles, monitor lizards, boars and even pangolins are not especially unusual. It is also especially useful if you've been sitting in the lab/office all day.
Getting masked up
May 21, 2017
If you think respirators and masks don't do much by way of blocking out muck when you're spray painting, think again. I've been spray painting the newly printed 3D parts for EDGAR's body and so have been using aerosol sprays as well as the air brush rather extensively.
The mask on the left is a mask that I've used and the one of the right is a new one. While you're not supposed to reuse these disposable masks, I've used the one of the left for maybe 3 or 4 occasions because I'm a cheapskate. But now seeing it next to the new mask, I think I will definately be throwing that one out.

Printing Some Skin (Posted 7th March 2017)
Many student roboticists get carried away with a desire to make their robot look nice or sophisticated, sometimes forgetting that it is much more important to get the robot to first work. However, aesthetics has to be considered also at the planning stage and definately not as an afterthought. First impressions count after all. So once the robot works, it may be time to be serious about looking good.
To that end, I have been wanting to beef up on EDGAR-2's appearance; Make him look more finished and less of a laboratory prototype. Thankfully, the NTU Robotics Research Centre in which I work now has a 3D printer! A very good one at that in my opinon. It's the Fortus 250mc from Stratasys. It is the perfect tool to prototype the many irregularly shaped (and sometimes complex) plastic shells that I have been wanting to make for EDGAR's arms. I say this because getting a machinist to make those shells would have cost much more and taken longer. It's worth remembering however, it is sometimes much easier and more worthwhile to make parts out of materials that are more readily available. It'd be quite a waste to print something simple such as a washer or a flat board.
The top cluster of three pictures on the left show the parts being printed. You can see the parts progressively getting larger as the print job nears completion. In all, this print took about 80 hours so the printer had to run continuously through the entire time. If power to the printer was disrupted during this time, it's bye bye print job and time to shed a few tears perhaps, then start over.
The middle picture shows the completed print job after I've just removed it from the machine. You can see that the printed parts (which are beige in colour) are printed on a removable tray (in black). At this point, the parts are piping hot. I'd estimate them to be about 80 degrees celsius since the print chamber is heated throughout the printing process. The parts are also encrusted with (whitish) support material that has to be removed.
I remove the support material by first disolving it in the solvent. This is shown in the bottom picture. Here, I am placing the entire tray into the solvent bath. The black tray is not reusable and is unfortunately discarded.
Foam Shaping (Posted 30th May 2016)
Apologies for being missing-in-action for the past few weeks as I've been busy with publicity events and writing. But as promised, here are a few of my tools for shaping foam.
In the top picture, you'll see the foam-shaping tools that I use. They include a bread knife from Ikea, a Japanese pull saw and sanding blocks of various grits from 3M. Do note that the knife and pull saw are very sharp tools and must be used with care.
When shaping foam, I start by cutting the larger chunks off with the pull saw until I get a rough shape. I then shave smaller slices off the foam using the bread knife to achieve a shape that is more accurate. To finish, I sand the foam down with sanding blocks, increasing the grit-count until I am satisfied with the smoothness of the foam. In the paragraphs that follow, I describe the use of each tool in more detail.
When removing large chunks from the foam, the Japanese pull saw is the most suitable. Unlike the typical saw that cuts on the "push" stroke, the pull saw cuts during the pull action. This enables greater control and accuracy when making cuts on wood and foam. The thin blade also means that less material is removed; In other words, the kerf is smaller. In the second picture from the top, you can gauge the control that I am able to exercise when using the pull saw as I am making a very thin cut of about 2mm from the foam block's edge. Unfortunately, I haven't seen it for sale in any Singaporean shops and I bought mine on the Internet. The down side to using this saw is that it generates some dust (not very much) as material is removed. It also does not leave a very smooth edge on the foam.
The Ikea bread knife is useful for shaving thin slices off the foam quickly. The serrated edge of the bread knife maintains its sharpness and so the blades moves easily through the foam. Rather than chopping at the foam with this tool, it's best to slice the blade into the foam at an angle as shown in the pictures to the left. Attempts to remove large chunks of material are better avoided as it will get snagged in the cut. If it does get snagged, gently lift the blade back off the cut and try to cut nearer to the material's edge instead. Don't force it through the foam but instead gently slice into the material while you apply pressure into the cut. Reminder: the knife is used for shaving the material, not sawing it. It is really sharp and a slip can easily end in a trip to the hospital. Do note also that the knife is suitable only for shaping softer materials like foam and perhaps balsa wood. If you're not comfortable using it, then skip from using the pull saw to the sanding blocks. You'll have more sanding to do but at least you'll keep all your fingers.
I've got three sanding blocks that I use often, ranging from 80-grit to 320-grit. The sanding blocks from 3M were purchased from a local hardware store (HomeFix DIY). They work like a charm when smoothing the foam to the desired contour as you can see in the bottom row of pictures. To make the foam even smoother, you may use sandpaper of finer grit to complete the shaping process.
Getting A Head (Posted 14th April 2016)
These pictures show the core of the mold that was made to vacuum form EDGAR-1's head. When this was being done, I had access only to a low-end desktop 3D printer. The bed on which the prints were made was rather small and so limited the size of the objects that I could print. I had to chop off the top of the head in my 3D CAD file so that I could fit the print on the machine's print-bed. The top picture shows the printed face next to my phone for scale.
I had to provide a forehead to the printed face and so decided upon high-density foam sheets from ArtFriend. I got the idea from one episode of Mythbusters where Adam Savage built the cowling for a ducted fan with layered styrofoam. Three sheets of 1-inch styrofoam were trimmed and glued to the top of the printed head with wood glue (middle left). I find that wood glue works best for bonding these styrofoam sheets together. Some superglues or contact cement can dissolve foam so its best to try gluing some scrap pieces first if you're not sure. I let the glue set for more than 24 hours before I started shaping the top of the head (middle right). Making sure the glue is completely dry before working is critical. The forces required to shape the foam can rip the foam layers off if the glue is not completely set. If that happens, you'll have to re-glue the layers and wait all over again. You may also get wet glue on your shaping tools which will of course blunt them if the glue isn't cleaned off.
In my next post, I will describe the use of my foam-shaping tools.
More Arduino Shields (Posted 13th April 2016)
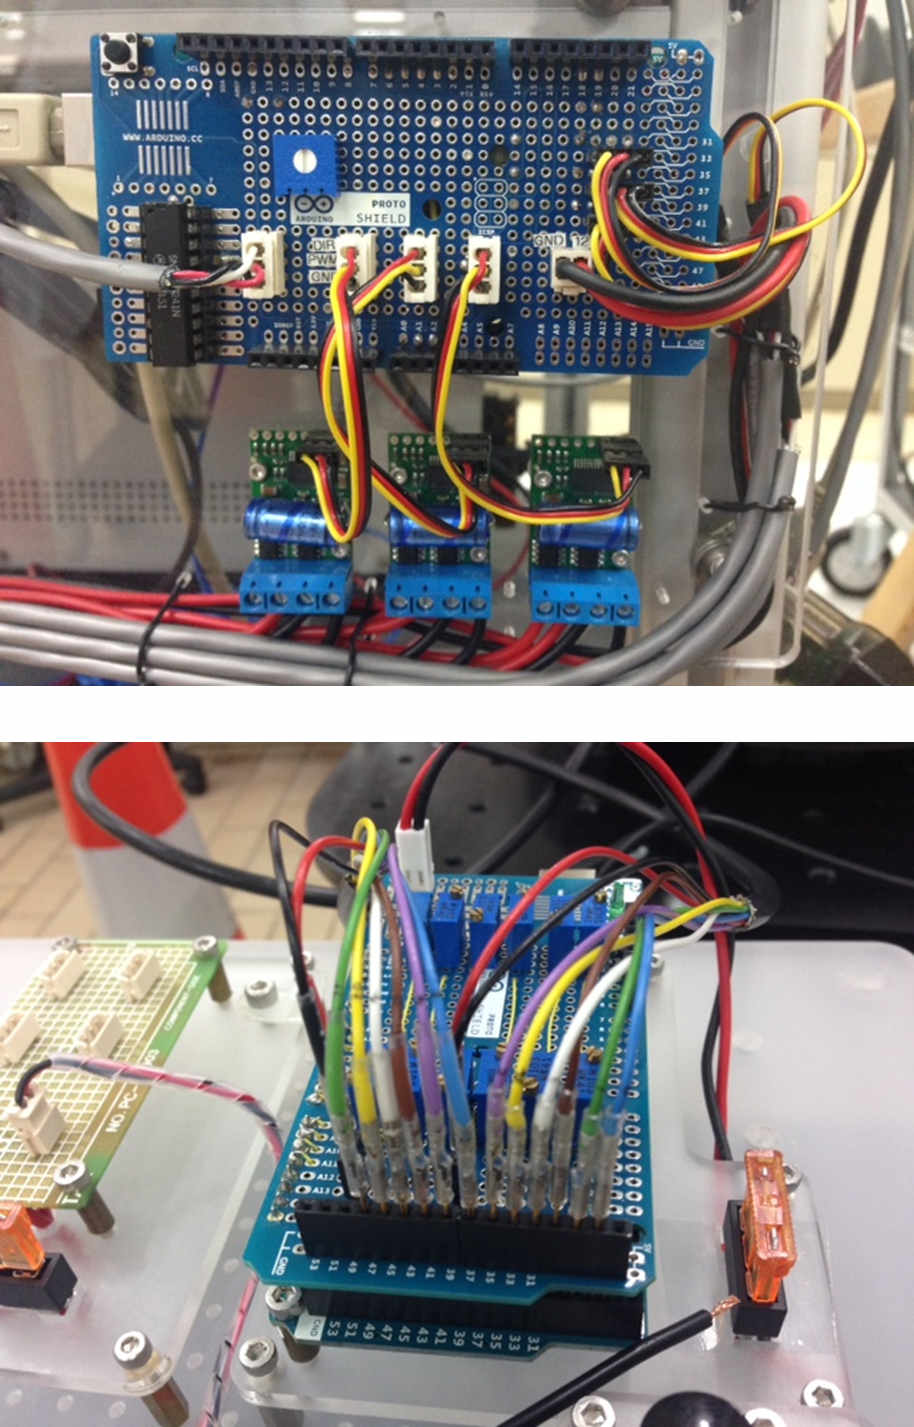
I know I've blogged about these boards previously but I came across these pictures and thought that they may be worth sharing. The pictures on the left show the front and back of a solderable breadboard (or shield) for the Arduino Mega microprocessors. It pays to have a neat layout on both sides as it makes physical installation on the microprocessor as well as debugging easier.
While the soldered board may be neat, making them can result in quite a mess as shown in the lower picture. :) If you are thinking of making many copies of the same expansion board, it may be worth getting a vendor to print the circuit out on a PCB (printed circuit board) instead. PCBs are not expensive but will likely be more reliable than hand-soldered boards.

Put Your Hands In The Air! (Posted 23rd March 2016)
EDGAR's forearm and hands. I designed and made these myself mostly out of laser cut acrylic and machined components. These were rather challenging but yet rewarding to design, especially since I did not have an access to a 3D printer previously. I've recently found that that there are shared 3D printable files on the Internet for robot hands. I've also realized that my design and those on the Internet are serendipitously similar, albeit with minor differences. Still, I think I will use the online designs as an inspiration if I have a chance to improve on the design of EDGAR's hands.
Today also marks one year from the day that I suffered my first burn with a soldering iron. >:(

Arduino Shields (Posted 9th March 2016)
Arduino Mega microprocessors! These are used to interface some actuators with a PC. The solderable prototyping boards are a real treasure for keeping circuits neat and tidy when using Arduinos. I get them from Element14 and sometimes from Sgbotic .
I'm pretty pleased with these circuit-building efforts although it's clear that there is still lots of room for improvement.
EDGAR-2 In The (Open) House! (Posted 8th March 2016)
A massive turn out at the NTU Open House 2016. Many were curious about EDGAR-2 and came to chat with him. Children in particular were delighted to interact with him. This interaction with the public has given us good insight about how people would like to communicate with such robots. Some could not resist the temptation to touch the robot and so a future goal may be to make the robot more robust to physical interaction with humans. Some were frustrated that they could not hear the robot properly due to the many people at the venue. We'll note these deficiencies and address them when we can. :)
Many thanks to NTU's Office of Admission and Financial Assistance (OAFA) for this opportunity. My heartfelt thanks also to my colleagues Mr Ang Yu Bin, Ms Pang Wee Ching, Mr Burhan and Mr William Gu for their assistance during this event.

On Camera. (Posted 3rd March 2016)
EDGAR-2 will be featured with NTU's Nadine robot for the "Celebrate NTU!" event which is happening from 2:30pm on the 8th of March at the Nanyang Auditorium. Here they are doing their lines for the cameras.

March Madness! (Posted 28th Febuary 2016)
Getting the EDGARs ready for the first week of March 2016. March madness commences! EDGAR-1 will be filmed in preparation for a new documentary called "Machine Impossible"on the National Geographic Channel. Meanwhile, EDGAR-2 will be featured on MediaCorp Channel 5 News on the 12th of March.
Also happening next week is the NTU Open House 2016 ! This will be happening on the 5th of March (9:30am - 6:30pm) in NTU so do come on that day if you want to learn more about studying in NTU and life in NTU. We are proud to be invited to showcase EDGAR-2 at this event. EDGAR-2 will be at the foyer of the School of Biological Sciences to tell you more about the University.

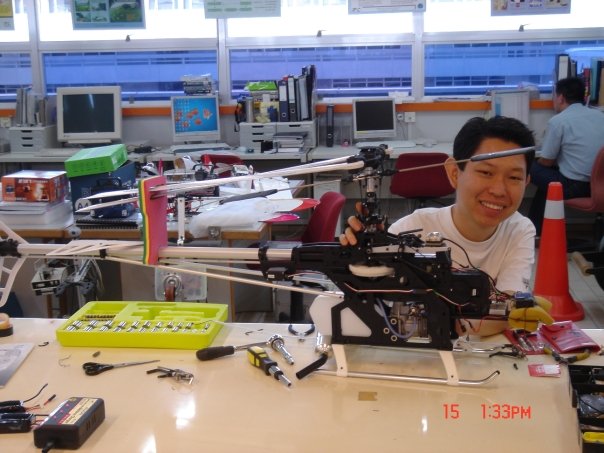
Helicopter Days
The picture on the left is one of myself working on a radio controlled helicopter at the NTU Robotics Research Centre back in 2008. I was helping to get the helicopter back to being "air worthy" after it had been sitting on the shelf for a few years.
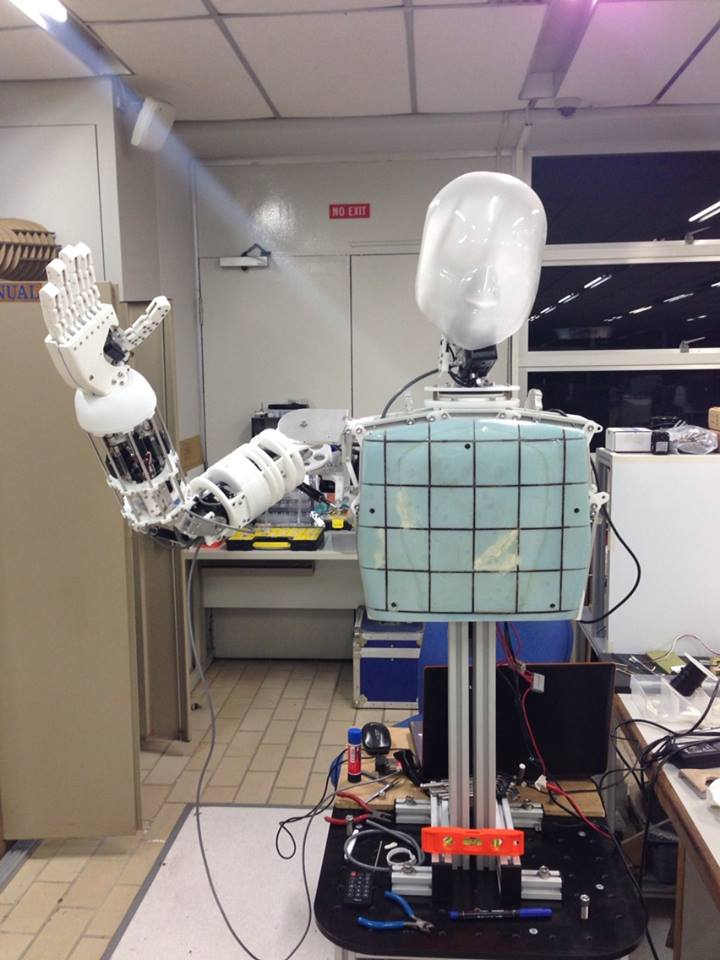
Early Days of Edgar
This is an early picture of EDGAR-1 from May 2014. He's only got one arm and does not yet have the 3 degree-of-freedom waist that he now has.
I get many queries about how EDGAR's chest plate is made. The unpainted chest plate here reveals the materials: laser-cut MDF board and blue high-density styrofoam. On top of the shaped foam and wood structure is a layer of fibreglass cloth and epoxy resin. This gives the chest plate a hard surface. All the materials for this chest plate except for the fiberglass cloth were from Art Friend. Fibreglass cloth can be purchased from hobby shops that specialise in model airplanes.
This chest plate may be easily 3D printed but I didnt have access to a 3D printer at that time. However, the 3D printed chest plate would most likely be much heavier than the wood and foam that I used.

Wong Choon Yue
On this page, I share some of my thoughts about robot development and will attempt to feature photos of my work on robots. Please do note that the thoughts expressed here are mine alone and do not reflect the views or opinons of Nanyang Technological University. Please also note that none of the posts here are sponsored.